![]()
![]()
![]()
|
|
|
|
If you click on the tab labeled Global, you will see the next screen, the Global Property Tab Dialog.
Shown below is the Global Property Dialog for Microsoft Expression; however the Dreamweaver version is nearly identical.
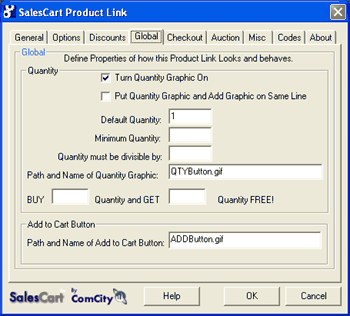
This controls the behavior of the "add-to-cart" button and "quantity" buttons displayed to the customer. The global property dialog also controls acceptable quantity's, default quantity's and minimum quantity's. By pointing the product link to a different graphic for, you can customize the look and feel of the Quantity representation and Buy buttons the customer sees for this particular product.
What does this do? Enables the Quantity graphic and allows you to display how you wish your customer to ask for the quantity of an item. If you so desire, you may create different graphics that are specific to your particular needs for each item you wish to sell. Although not recommended because it may create a confusing user interface, you can actually make multiple graphic buttons and you may change them for each and every product if you so desire. Create new graphics and button graphics with a graphic tool such as Adobe Photoshop or Corel Draw. You may use any combination of text and graphic to request the information you desire from your customer.
You may turn the quantity graphic completely off by selecting and un-checking the "Turn Quantity Graphic On" checkbox. This will turn the quantity graphic completely off and any name you provide for the Quantity graphic will be ignored.
Default? Checked
What does this do? If you wish to have the Quantity graphic and the Add-to-Cart Button graphic on the same line, check the box labeled "Put Quantity Graphic and Add Button Graphic on Same Line." If the box is not checked, the Quantity box and the Add-to-Cart Button will be on separate lines.
You can control other aspects of the Quantity Graphic and Add Button Graphic display by placing the SalesCart product link component in a table cell. Doing so will allow you to control the width and height of the table cell. The table cell settings can override the original product link component settings.
Default? Unchecked
What does this do? The Default Quantity establishes the quantity the customer will originally see in the box.
Default? 1
What does this do? The Minimum Quantity is the smallest quantity the customer can order. If the customer orders an amount below the minimum, a warning will be given, and the minimum will be enforced.
Default? Blank
What does this do? By selecting "Quantity selected must be divisible by" you can require your customer to purchase a certain number of items based on a divisible relationship of items in a unit. For example, setting a divisible quantity of 2 would require an item be purchased in pairs. So a customer could purchase 2, 4, 6. Set 6 for half-dozen, or 12 for dozen, etc. Indicate the mandatory quantity requirement near your product so your customers will order in the proper amount. If the customer attempts to order a quantity outside of this range, they will receive a message stating " The quantity chosen is below minimum quantity of ___."
Default? Blank
What does this do? Provides the path and name for the new "quantity" graphic button if you created one. If this graphic is in a separate path, you will need to provide the relative path to the mall folder where the product page is located, for instance ../images/QTYButton.gif would go back down one path level and then go to the /images folder. Otherwise, leave as is.
Default? QTYButton.gif (located in the /mall folder, in the same folder as the products so no folder is specified)
What does this do? Provide your customer with a certain free quantity of items if a certain number of items are purchased by enabling the Buy __ and GET ___ FREE! fields. The Free items will be noted on the View Order screen in the quantity field. The discount per item will be noted in Each column of the View Order screen. In the below example, Buy 12 Quantity and GET 1 Quantity FREE, were the values entered in the product link. If the customer entered a quantity of 13, this is how an example View Order screen might appear:

Default? Both fields blank
What does this do? Provides the path and name for the new "add-to-cart" button if you created one. If these graphic files are not in the same folder as your products, you will need to provide the relative path to the folder where the product pages are located, for instance ../images/ADDButton.gif would go back down one path level and then go to the /images folder. Otherwise, leave as is.
Default? ADDButton.gif (located in the /mall folder, in the same folder as the products so no folder is specified)
Click OK to save the changes to the Product Link.