![]()
![]()
![]()
|
|
|
|
If you click on the tab labeled Options, you will see the next tab – the Options Property Tab Dialog.
Shown below is the Options Property Dialog for Microsoft Expression; however the Dreamweaver version is nearly identical.
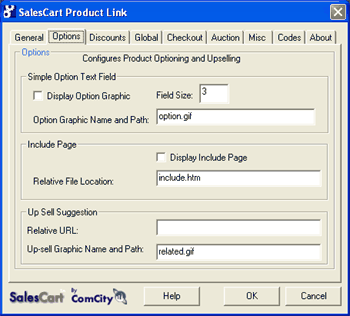
The options property dialog controls product options or option lists, which you may provide to your customers to define specifics about your product.
Options are essential for certain types of product, such as clothing or apparel, when you need to offer choices of color, size, or type. They can also be used to offer customization of a single item for a particular customer, such as a name to be engraved on a bracelet or piece of jewelry.
SalesCart provides two ways to configure options. First, you may create a "simple option" text field. This type of option is more appropriate for the jewelry option. The second type of option is the "include page". Both are discussed here.
The Simple Option Text Field provides a simple and convenient way for any level of user to collect very simple text-based information that customizes a single option for a particular item.
What does this do? The Simple Option Graphic box when checked, allows you to display an option graphic to explain to your customer what you need, along with a form text field to gather the specific information. The default option graphic is named option.gif and is located in your /mall folder of the SalesCart website (/mall/option.gif). You will want to create an option graphic that is specific to your particular needs for the items you wish to sell. You can make multiple option graphics, and you may change them for each product if you so desire. Create the option graphic in a graphic tool such as Adobe PhotoShop or Corel Draw. You may use any combination of text and graphics to request the information you desire from your customer.
Default? Unchecked
When you want to: Collect one additional piece of information about the product. If you need more flexibility, you must use an Include Page.
What does this do? Specify the field size for this text field, i.e. the number of spaces to allow for customer input requested by your option graphic.
Default? 3
What does this do? Tells the SalesCart Product Page where it can find your option graphic relative to product link location.
Default? option.gif- this is located in your /mall folder of the SalesCart website (/mall/option.gif)
 For example: If you wish to use a simple option text field to collect just one piece of additional information follow this procedure:
1. Create the option graphic using graphic tool such as Adobe Photoshop or Corel Draw.
2. Select the Option property tab dialog as shown above and click on the "Display Option Graphic" checkbox. This will turn on the Simple Option Text Field.
3. Type in the name of the option graphic file you previously created. If this graphic is in a separate path, you will need to provide the relative path from this product page to the graphic, for instance ../images/option.gif would go back down one path level and then go to the /images folder. The field defaults to just option.gif because the option.gif file is normally located by default in the same folder as the product page /mall.
4. Specify the field size for this text field, i.e. the number of spaces to allow for customer input requested by your option graphic.
5. Below is a two part example of what you would see if the option.gif was changed to read "Wet or Dry". Refer to the low text box.
|
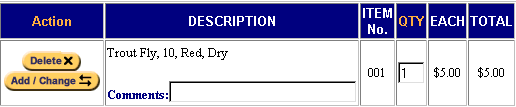
6. Below is an example of the View Order screen that will appear if the customer types in Dry and Clicks on Add to Cart. As you can see, the word "Dry" appears in the Description field:
|
What does this do? The Include Option Page allows you enormous flexibility to describe specific options about the product you are selling. These can be any kind of option you need including size, color, material, or whatever else that makes this item specific among a group of the same type of items.
Default? unchecked
What does this do? Tells the SalesCart Product Page where it can find your Include Page relative to the location of the product link.
Default? include.htm.-this is located in your /mall folder of the SalesCart website (/mall/include.htm) You do not need to name the file exactly with the name "include.htm". In fact, you can also create more than one include.htm file to include.
For example:
1. The first step to using the Include Option Page is to create a simple webpage that shows the option fields that you wish to use. An example Include Option Page is included for your use called include.htm. We suggest that you use Macromedia or FrontPage to modify the include.htm for the different product options you wish.
2. The file named include.htm found in the mall folder, is an example of an Include Option Page that has already been reduced to the bare essentials. You may edit this page in Notepad and print it out to see what it looks like. It is included below.
<% 'edit this file for the options you want to display 'There is no longer a maximum number of options but all must be named option 'you can delete the options you don't need 'you can specify a price increase for option but separating the option value with the delimiter (default=$) specified in the wizard %>
<p><strong>Size:</strong> <select name="option" size="1"> <option value="5">5</option> <option value="5.5">5.5</option> <option value="6">6</option> <option value="6.5">6.5</option> <option value="7">7</option> <option value="7.5">7.5</option> <option value="8">8</option> <option value="8.5">8.5</option> <option value="9">9</option> <option value="9.5">9.5</option> <option value="10">10</option> <option value="10.5">10.5</option> <option value="11">11</option> </select><br> <strong>Color:</strong> <select name="option" size="1"> <option value="Red">Red</option> <option value="Blue">Blue</option> <option value="Green">Green</option> <option value="Black">Black</option> <option value="Tan">Tan</option> </select><br> <strong>Type:</strong> <select name="option" size="1"> <option value="Cotton">Cotton</option> <option value="Wool">Wool</option> <option value="Polyester">Polyester</option> </select><br> <strong>Size Range:</strong> <select name="option" size="1"> <option value="Adult$5.00">Adult</option> <option value="Child">Child</option> </select> Adult Size, Add $5.00<br> <strong>Wash Instructions:</strong> <select name="option" size="1"> <option value="No-Wash">No-Wash</option>
|
<option value="Pre-Wash">Pre-Wash</option> <option value="Bleach">Bleach</option> </select>
<br> <font color="#808080">Add as many options and price adjustments as you like<br> </font> |
3. You can have an unlimited number of options. As you can see by this example, we found it difficult to think up options after three. If you wish to remove the last two options, you can simply delete option 4 and option 5 from the current include.htm file.
4. You can then customize the other options for your particular needs.
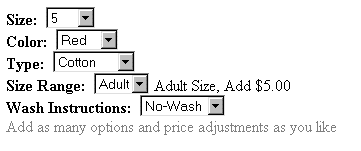
5. Below is how the above Include example looks when previewed:
|
6. As you can see by looking at Size Range above, you can use the Multi-Option Pricing feature found in the SalesCart Wizard to increase or decrease the base price of the item when selected. The Option value of $5.00 for the Adult size will cause the base price of the item to be increased by $5.00 if this option is selected. See the section on Multi-Option Pricing below.
![]() Important: The name you decide to call your option is defined in the SalesCart Wizard. By default, the Wizard uses the name "option" You can use any name (except "simpleoption"), but you must use the same name for your option consistently throughout the Include that you defined in the Control Panel.
Important: The name you decide to call your option is defined in the SalesCart Wizard. By default, the Wizard uses the name "option" You can use any name (except "simpleoption"), but you must use the same name for your option consistently throughout the Include that you defined in the Control Panel.
If you do not know html, you can use your design tool to create form options. Just make sure to name the fields with the name you defined in the Wizard. Once completed, simply click on HTML mode and delete all of the extraneous html code except for the critical part as seen in the include.htm file. Extra html code will slow down download. You do not need to name the file exactly with the name "include.htm." In fact, you can also create more than one include.htm file to include. If every product you sell is completely different with completely different options, you can include an option description file for each product you have if you so desire. More than likely, however, you probably will create at most ten or twenty option files that will describe the bulk of your products.
Use the Multi-Option Pricing feature found in the SalesCart Wizard to increase or decrease the original price of an item depending on the "option" or variation of the item the customer chooses. If you plan on keeping the Include variable name as "option," you do not need to change any information in the Wizard.
For example:
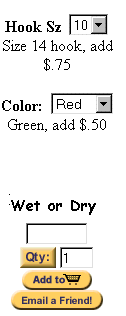
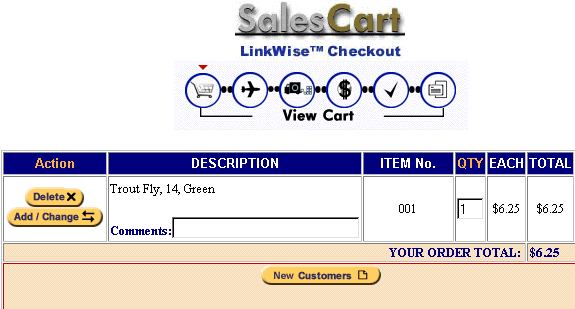
1. The below html sample shows how you could charge $.75 more for the size 14 hook and $.50 more for the same item in the color Green. If the original cost of the item is $5.00 and the customer chooses the green version in the size 14 hook, the new unit cost of the item excluding any shipping, handling, or taxes will be $6.25. To decrease the price put <option value="14$-.75">
<% 'edit this file for the options you want to display 'There is no longer a maximum number of options but all must be named option 'you can delete the options you don't need 'you can specify a price increase for option but separating the option value with the delimiter (default=$) specified in the wizard %>
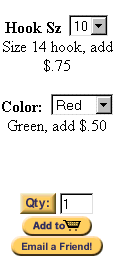
<p><strong>Hook Sz</strong> <select name="option" size="1"> <option value="10" selected>10</option> <option value="12">12</option> <option value="14$.75">14</option> </select> Size 14 hook, add $.75<br> </select><br> <strong>Color:</strong> <select name="option" size="1"> <option value="Red">Red</option> <option value="Blue">Blue</option> <option value="Green$.50">Green</option> <option value="Black">Black</option> <option value="Tan">Tan</option> </select> Green, add $.50<br>
</select><br> </select>
<br> <font color="#808080"><br> </font> |
2. This is what this Multi-Option Pricing example would look like when previewed on your Product Page:
|
3. This is example View Order screen of what it might look like when the customer presses Add to Cart:
|
![]() Note: You can make an Include Page look any way you want. Specify colors, text fonts, even graphics then remove the code in front of and behind the "basic" option defining html code.
Note: You can make an Include Page look any way you want. Specify colors, text fonts, even graphics then remove the code in front of and behind the "basic" option defining html code.
In addition to providing customer discounting, you may also notify customers of other products or options that would be important to order if they purchase a certain product item. We call that an "Up-Sell" suggestion.
What does this do? In order to use the Up-Sell suggestion, first you must create a webpage that describes the additional items or information that you wish to tell the customer about if they select a particular item. This page is created in the same fashion as you would create any other webpage and will not be discussed here. Once this page is created, you simply enter the relative URL of this page in the Up-Sell Suggestion Relative URL field in the Product Page you are currently editing. The URL is relative to the current /mall folder where the product page is normally saved.
Default?
What does this do? The upsell Graphic name and path contains the name of the graphic to display for this product for the upsell hyperlink on the View Order checkout page. If you want, change the picture for each product, create multiple images and locate those names relative to the /cgi-bin. The default for all products is a single image related.gif located in the cgi-bin folder
Default? related.gif
For example:
1. If you create an html file named fly rods.htm and locate it on the root, you would type in ../flyrods.htm for the relative URL. The "../" tells the system to go "down" one level to find the flyrods.htm page.
2. When the customer gets to the View Cart page, there will be a button to click on to view this particular page. The default upsell Graphic name and path is related.gif located in the same folder as the checkout pages. You may change what this graphic looks like for each product by editing the .gif file named related.gif located in the /cgi-bin folder. You cannot name this image file with a different name, or have more than one graphic.
3. If you click on the (default) graphic called Click For Related Items it will take you to the flyrods.htm page.
|
If you do not wish to have an upsell graphic shown for an item, or wish to turn it off, edit the Options property dialog and completely remove and delete all characters from the Up-Sell Suggestion relative URL field. The image file named space.gif is shown for any item where the Up-Sell Suggestion relative URL is left blank.