The Upgrade Utility
Follow these Steps to start using the Upgrade utility.
 Note! If you have non-HTML files located in your product pages folder that you do not wish to change. Copy or Cut those files to a different folder before you run the Upgrade Wizard Tool and then paste them pack into the folder when the Tool is done.
 Warning! If you are Upgrading to SalesCart NET, review the precautions and warnings shown at the end of this section before running the Upgrade utility. Files will be automatically changed! Always have a backup first -- before running this tool!
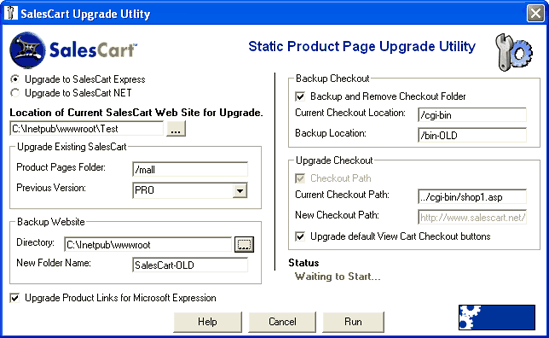
The following screen shows one typical view of an upgrade from SalesCart PRO to SalesCart Express with the web site to be upgrade located at c:\inetpub\wwwroot\test\ and the web site root at test.

Typical settings for SalesCart PRO upgrade to SalesCart Express
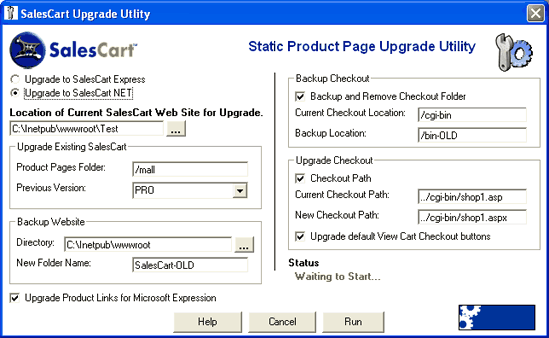
The following screen shows one typical view of an upgrade from SalesCart PRO to SalesCart NET with the web site to be upgrade located at c:\inetpub\wwwroot\test\ and the web site root at test.

Typical settings for SalesCart PRO upgrade to SalesCart NET
- To start the upgrade utility, Select Upgrade Utility from the SalesCart Tool Bar or SalesCart Menu, using your mouse, select from the menu, SalesCart>>Upgrade Utility.
- You will then see the Upgrade Utility Tool screen.
- Select whether you are upgrading to SalesCart NET or SalesCart Express by pressing the radio button next to your choice.
- For the field, Location of SalesCart Web Site, enter the disk-based path to your SalesCart folder or use the browse button (denoted as ...) to select the folder. An common example entry is: C:\Documents and Settings\YourName\My Documents\My Web Sites\Salescart.
- Upgrade Existing SalesCart Product Pages Folder: Select the name of the folder in your web site that contains the product pages. Normally, by default, this is /mall.
- Upgrade Existing SalesCart Product Version: Select the SalesCart Product Version that you wish to upgrade from by pressing the down arrow next to Choose One. Highlight the previous SalesCart version that the web site you are upgrading from currently has on it with your mouse.
- Backup Website Directory: This will automatically backup your SalesCart website for you. Type in a root folder or directory without the name of the backup folder or press the Browse ... button to choose an existing root folder name.
- Backup Website New Folder Name: This will specify the folder name that the SalesCart website will be placed into. Type in the folder name only or leave the default SalesCart-OLD.
- Upgrade Product Links for Microsoft Expression: This will attempt to look at each of your product links and upgrade them to work with Microsoft Expression. If you are using Microsoft Expression, leave this field checked. If you are using a different design tool, uncheck this field.
- Backup Checkout, Backup and Remove Checkout Folder: If you are upgrading to SalesCart Express, you no longer need a cgi-bin folder. If you are upgrading to SalesCart NET, its up to you whether you wish to keep a separate backup of your cgi-bin folder. If you decided to backup and remove the Checkout Folder, do so by selecting the checkout Backup and Remove Checkout Folder button. If you are upgrading to SalesCart Express, make sure this option is checked. If you do not need the backup, de-select the checkbox labeled Backup and Remove Checkout Folder.
- Backup Checkout, Current Checkout Location: If you previously selected the option to Backup and Remove Checkout Folder, specify the folder name of the current checkout folder. By default, this is /cgi-bin.
- Backup Checkout, Current Backup Location: If you previously selected the option to Backup and Remove Checkout Folder, specify the folder name you wish to backup the checkout folder to. By default, this is /cgi-old.
- Upgrade Checkout, Checkout Path: This will upgrade the checkout path in the product links to the new checkout paths of the upgraded product you have selected. This is the most important part of the upgrade. If you de-select Checkout Path, no product links will be upgraded. You should make sure that Checkout Path is selected. If you are upgrading to SalesCart Express, you may not disable this option and it will be greyed out.
- Upgrade Checkout, Current Checkout Path: Specify the Current Checkout Path. The product links current by default checkout path will be determined when you select the product you are upgrading from. If you have customized this from the default, specify the new path you use to point your Product Pages to. By default, this will be ../cgi-bin/shop1.asp for all SalesCart asp product links or ../cgi-bin/shop1.aspx for all SalesCart NET product links.
- Upgrade Checkout, New Checkout Path: Specify the New Checkout Path. This will be automatically determined based on the product you are upgrading to. We suggest that you do not change this value unless you understand its implications. This is the name of the new first link Checkout page. If you are upgrading to SalesCart Express, you may not specify this option and it will be greyed out.
- Upgrade Checkout, Upgrade Default View Cart Checkout Buttons: You may check this option to have any view cart references in your existing product pages to upgrade to the new SalesCart view cart pages. This option will only upgrade the names to the normal SalesCart defaults for the view cart checkout page for the particular SalesCart upgrade that you have chosen to perform. By default, this option is checked.
- Click Run when you are ready to start.
- The tool will start to perform the actions selected.
- The status will change to as it progresses from
Backing Up Files ...
Renaming Checkout Location ...
Changing Checkout Path ...
Renaming Product Pages ...
DONE
- The tool will show Done when the tool is done.
- Click OK after the upgrade is complete and to exit the Tool. This will end the program.
- Continue on to the next section for your particular design tool.
Navigation Buttons
Help: Displays this Help page.
Cancel: Closes the Upgrade Utility immediately.
Run: Starts the Upgrade Utility based upon the settings entered. If there are insufficient settings, the Upgrade Utility will present errors.
![]() Note! If you have non-HTML files located in your product pages folder that you do not wish to change. Copy or Cut those files to a different folder before you run the Upgrade Wizard Tool and then paste them pack into the folder when the Tool is done.
Note! If you have non-HTML files located in your product pages folder that you do not wish to change. Copy or Cut those files to a different folder before you run the Upgrade Wizard Tool and then paste them pack into the folder when the Tool is done.![]() Warning! If you are Upgrading to SalesCart NET, review the precautions and warnings shown at the end of this section before running the Upgrade utility. Files will be automatically changed! Always have a backup first -- before running this tool!
Warning! If you are Upgrading to SalesCart NET, review the precautions and warnings shown at the end of this section before running the Upgrade utility. Files will be automatically changed! Always have a backup first -- before running this tool!
