This procedure needs to be completed in the exact order specified
below. Failure to complete the steps in the exact order specified below may
result in errors.
Step 1: Set Up IIS to allow parent paths
Note: The following steps need to be performed on the web server by the server administrator:
- Open Internet Information Services Manager. Start > Programs >
Administrative Tools > Internet Information Services (IIS) Manager
- Expand (click on the plus sign) SERVER_NAME (local machine) > Web Sites >
Site Name.
- Right-click the Site Name and select Properties.
- Select the Home Directory tab.
- Select Configuration.
- Select the Options tab.
- Check the Enable Parent Paths checkbox.
- Select OK > OK.

Step 2: Set Up Static DSN on the Web Server
Note: The following steps need to be performed on the web server by the server administrator:
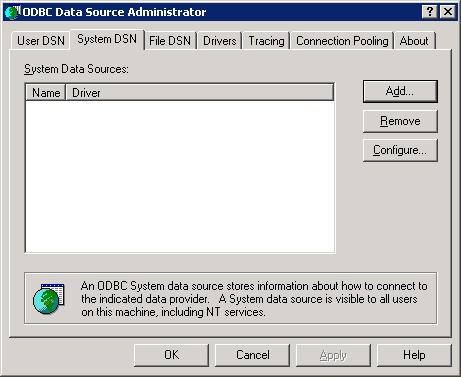
- Open ODBC Data Source Administrator. Start > Programs > Administrative
Tools > Data Sources (ODBC).
- Select the System DSN tab.
- Select Add.
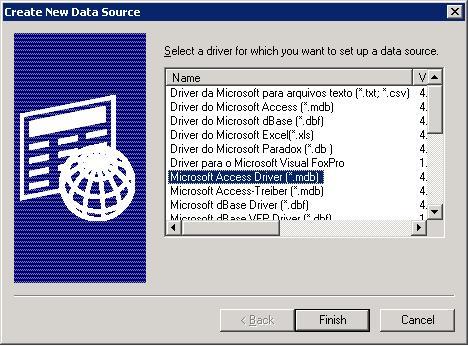
- On the Create New Data Source Wizard screen Select MicroSoft Access Driver
(*.mdb) and Select Finish.
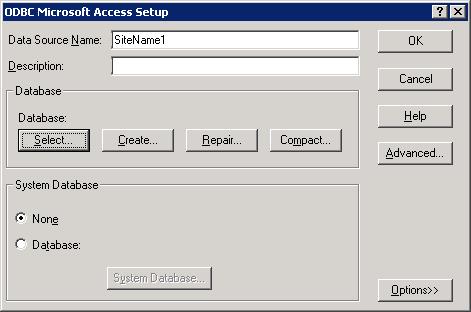
- On the ODBC MicroSoft Access Setup screen enter the Data Source Name and
choose Select.
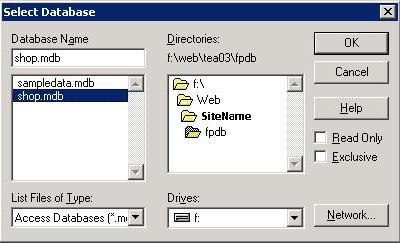
- On the Select Database screen, Browse to the absolute path of the shop.mdb
database and highlight the shop.mdb database.
- Select OK.
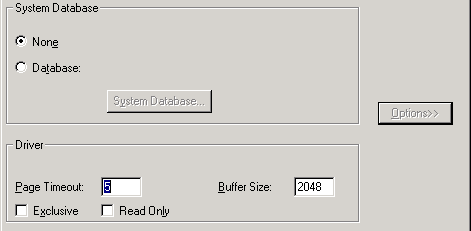
- Select Options and uncheck the option called Exclusive. Click OK > OK.
Step 3: Set SalesCart to use static DSN connection within
FrontPage
Note: The following steps are performed by the SalesCart user within the FrontPage
client.
- In FrontPage, Open the SalesCart site on the remote web server.
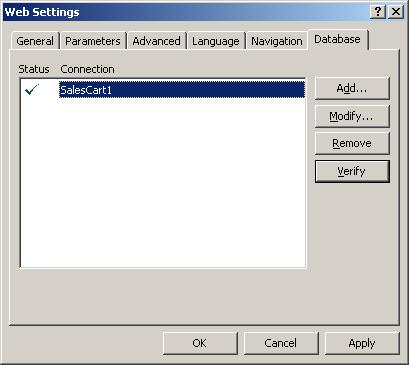
- Modify the database connection. Select Tools > Web Settings > Database
tab.
- Highlight the existing Salescart1 database connection and select Modify.
- Select the 'System data source on web server' radio button and select
Browse.
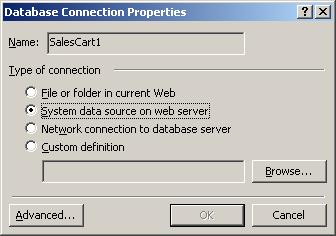
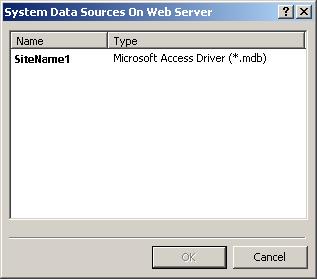
- Select the data source created in Step 1 and select OK.
- Select OK.
- Highlight the modified SalesCart1 database connection and select Verify.
- Select Apply > OK
Step 4: Set Correct Database Permissions
Note: The following steps need to be performed on the web server by the server administrator:
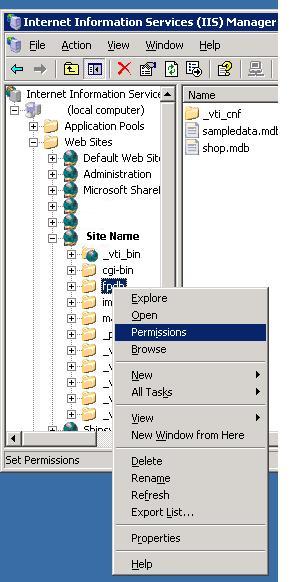
- Open Internet Information Services Manager. Start > Programs >
Administrative Tools > Internet Information Services Manager
- Expand (click on the plus sign) SERVER_NAME (local machine) > Web Sites >
Site Name > FPDB.
- Right-click the FPDB folder and select Permissions.
- Select the Internet Guest Account (SERVERNAME\IUSR_SERVERNAME) user
account and select Modify.
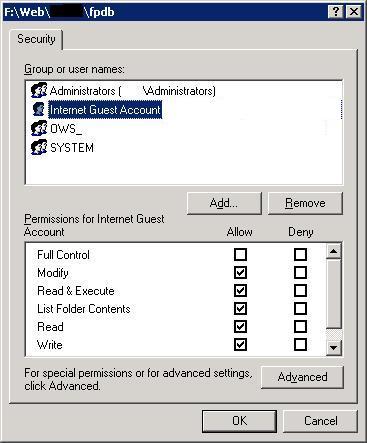
- Select OK.
Step 5: Remove Anonymous browse access from the FPDB directory
Note: The orders database is not secured until this step has been
completed! There are two methods to disable Browse access. Both
methods are covered below.
Method 1: Performed by the SalesCart user
Note: Initially this step should be performed on both the local and remote
(live) copies of the Salescart website.
- In FrontPage, open the local copy of your SalesCart Website.
- Right-click on the FPDB folder and select Properties.
- Uncheck ALL available check boxes in the FPDB Properties Screen.
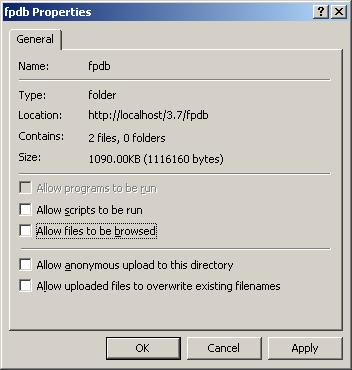
- Select Apply > OK.
Method 2: Performed by the server administrator
- Open Internet Information Services Manager. Start > Programs >
Administrative Tools > Internet Information Services Manager
- Expand (click on the plus sign) SERVER_NAME (local machine) > Web Sites >
Site Name > FPDB.
- Right-click the FPDB folder and select Properties.
- On the Directory tab Uncheck the following boxes:
- Script Source Access
- Read
- Write
- Directory Browsing
- Index this resource
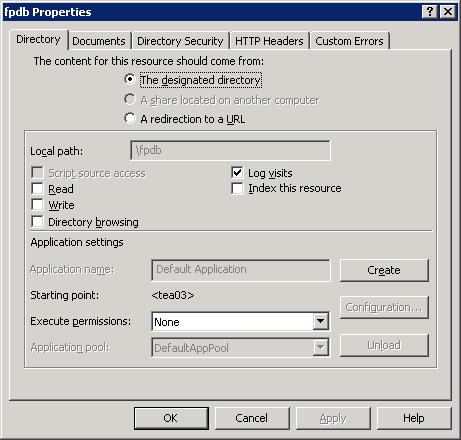
- Select OK.
Step 6: Configure SalesCart to use CDOSYS to send merchant
and customer emails
- See the following Knowledge Base article:
http://support.salescart.com/kb/KB-details.asp?key=5316