|
INFO:
How to specify additional checkout pages.
The information in this article applies
to this particular SalesCart Product(s):
PRO
SYMPTOMS
The following is an exaplanation of how you can create additional checkout pages. |
CAUSE
This articles explain how SalesCart PRO can be customized to display additional checkout pages.
RESOLUTION
If you would like to point your
website visitors to an alternate page before proceeding to the order
summary page (view1.asp) you may do so by following the steps below. This
feature is very useful when you want to collect additional information or
to simply to display "related items" to your customer.
|
To begin, follow the steps below:
- Open your product page, double click the
SalesCart Product Link and go to the "Checkout" tab.
- Look for the "Path and Name of Checkout Page"
section. (Shown below)

- Specify the name of the duplicate shop file that
will redirect to the additional page.
- Keep in mind that this will only work
for the particular product that you specify. If you are using the
SalesCart product link dynamically then all products will use the same
Checkout page.
- Determine what you are going to name
your alternate shop checkout page. In most cases you can just make a
duplicate copy of shop1.asp and rename it to whatever you like. In
this case re-name it to "SHOP2.ASP".
- You always want
to make sure that the page is saved in the "CGI-BIN".
Do not change the extension of the page.
- Once you have edit the SalesCart Product Link go
ahead and click the "Ok" button. Save your product page and proceed to
the next step.
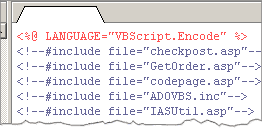
- Create a new ASP page in the CGI-BIN of
your website. Name it TEST.ASP. Go in the source of the newly Web
page and add the following lines to the top of the page. Right above the
tag. (shown in the example below)
<%@ LANGUAGE="VBScript.Encode" %>
<!--#include file="checkpost.asp"-->
<!--#include file="GetOrder.asp"-->
<!--#include file="codepage.asp"-->
<!--#include file="ADOVBS.inc"-->
<!--#include file="IASUtil.asp"-->

- After you have added the codes above you can edit
this page to look and feel any way you like. You may want to add a
"Continue Checkout" or "View Cart" button and link it to view1.asp, if
are you going to have additional product links on this page then you
need not worry about this. The possibilities or customizations is
limitless! The page design
customization should be done after you have successfully tested this
customization.
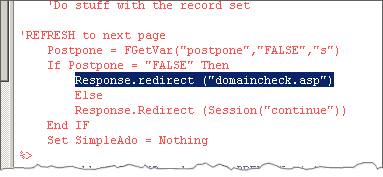
- Go back and open the duplicate shop file (shop2.asp).
Scroll down to line 178 (If you can not find it, take a look at the
image example below) and find the following line:
-
Response.redirect ("view1.asp")
- Change it to
Response.redirect ("TEST.ASP")
- Save the file.

- You are all done. To test this, just simple point
your browser to the product page that is changed, click the "add to
cart" button and see if you will be re-directed to "sho2.asp".
|
|
 |
|
By default, when the "add to cart"
button is selected the product information is first submitted to shop1.asp
and then to view1.asp (Click on the image to the left to view a larger
version) |
| |
|
|
 |
|
After you have completed the
customization above, the product information is going to be submitted to
shop2.asp and then re-directed to TEST.ASP (Click on the image to the left
to view a larger version) |
| |
|
| Note: This is
a SalesCart customization. There will be little or no support for this
customization. You should always keep a back-up copy of your files so that
you can roll-back just in case. |
SUMMARY
Display additional checkout pages.
STATUS
This is a customization for SalesCart PRO.
REFERENCE
none
Additional Query
Words: customize checkout, checkout, shop1.asp, checkout path, file name
Active/inactive: Active
Author: WS
Date: 10/22/02
|
