![]()
![]()
![]()
|
|
|
|
The following SalesCart ToolBar can be seen in Microsoft Expression when the product is installed. The ToolBar's view state and docking state is controllable within the design tool so it can be hidden and may not be seen initially unless it is turned on. The commands of the ToolBar are identical to the SalesCart Menu.
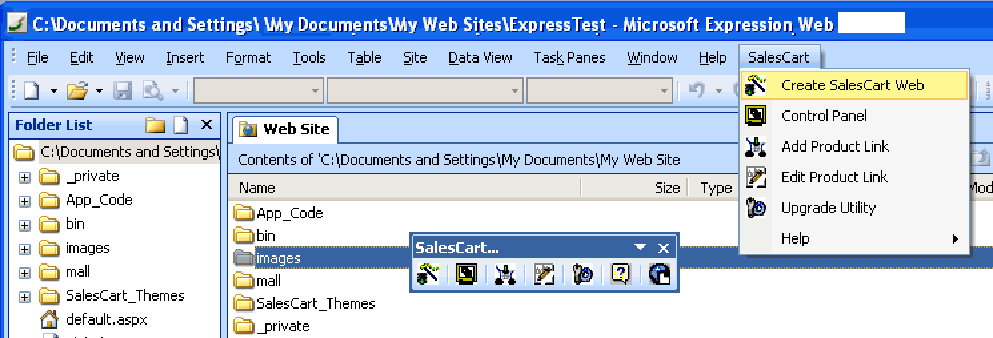
SalesCart ToolBar
To Enable the toolbar in Expression, click on Edit>>ToolBars. You will see the following dialog box:
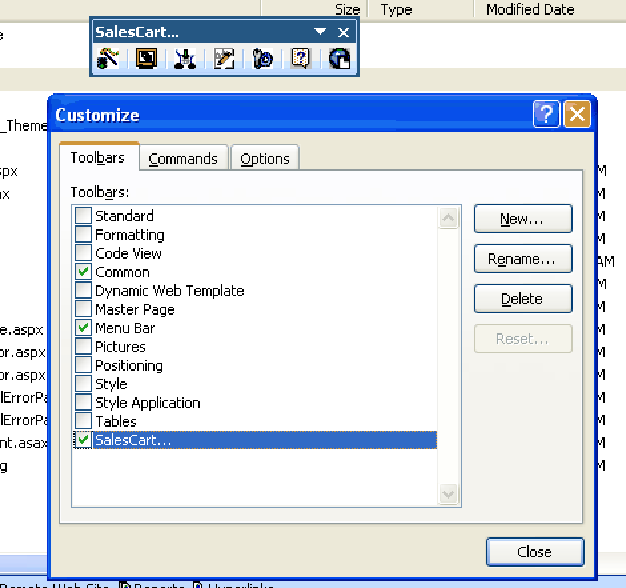
Customize ToolBars Dialog Box
The order in which the menu appears is the general order in which one would proceed to create a working SalesCart website.
![]() Create SalesCart Web: Runs the SalesCart Wizard either by creating a new website or by adding the applicable SalesCart files directly to an existing open web site. The SalesCart Wizard will ask some basic whole site configuration questions to specify the website control. These settings except for the email address of the merchant should be left "as is" except in cases of advanced users.
Create SalesCart Web: Runs the SalesCart Wizard either by creating a new website or by adding the applicable SalesCart files directly to an existing open web site. The SalesCart Wizard will ask some basic whole site configuration questions to specify the website control. These settings except for the email address of the merchant should be left "as is" except in cases of advanced users.
![]() Control Panel: Links to the SalesCart Express Control Panel at http://www.salescart.net/admin. The control panel specifies all the individual parameters that define how your store will run. You will define your user, accept the SalesCart License, and define the major aspects of your store. You will define shipping and taxation or review your orders at the Control Panel.
Control Panel: Links to the SalesCart Express Control Panel at http://www.salescart.net/admin. The control panel specifies all the individual parameters that define how your store will run. You will define your user, accept the SalesCart License, and define the major aspects of your store. You will define shipping and taxation or review your orders at the Control Panel.
![]() Add Product Link: Once the SalesCart wizard has been run and the store defined, you will define products using this action. You simply position your cursor on a Product Page and click on this SalesCart menu option to pull up the SalesCart Product Link Dialog. This dialog will define the aspects of each product such as price, description, sku and other attributes about each product.
Add Product Link: Once the SalesCart wizard has been run and the store defined, you will define products using this action. You simply position your cursor on a Product Page and click on this SalesCart menu option to pull up the SalesCart Product Link Dialog. This dialog will define the aspects of each product such as price, description, sku and other attributes about each product.
![]() Edit Product Link: If you have already added a product to a page, you may edit the products attributes by clicking your cursor within the product link and selecting this SalesCart menu option. When this option is selected, the SalesCart Edit Product Link Dialog will appear along with the product attributes you have previously defined for the product on which you have clicked.
Edit Product Link: If you have already added a product to a page, you may edit the products attributes by clicking your cursor within the product link and selecting this SalesCart menu option. When this option is selected, the SalesCart Edit Product Link Dialog will appear along with the product attributes you have previously defined for the product on which you have clicked.
![]() Upgrade Utility: If you ran the SalesCart Wizard on a website that previously contained an earlier version of SalesCart, you may use this utility to upgrade the static product pages in the website so that they will be compatiable with SalesCart Express. The upgrade utility will not upgrade dynamic SalesCart product pages.
Upgrade Utility: If you ran the SalesCart Wizard on a website that previously contained an earlier version of SalesCart, you may use this utility to upgrade the static product pages in the website so that they will be compatiable with SalesCart Express. The upgrade utility will not upgrade dynamic SalesCart product pages.
![]() Help>>SalesCart Help: You are currently viewing this option. This option provides a direct link to the latest online SalesCart ToolBar and Menu Help.
Help>>SalesCart Help: You are currently viewing this option. This option provides a direct link to the latest online SalesCart ToolBar and Menu Help.
![]() Help>>Online Support: This will take you to our online Support ticketing Website so that you may submit a Support ticket.
Help>>Online Support: This will take you to our online Support ticketing Website so that you may submit a Support ticket.